
In this tutorial, you will learn how to configure ELK stack endpoint security. Recent versions of ELK/Elastic stack now ships with security and SIEM capabilities. According to the overview page;
Elastic Security provides the following security benefits and capabilities:
- A detection engine to identify attacks and system mis-configurations
- A workspace for event triage and investigations
- Interactive visualizations to investigate process relationships
- Inbuilt case management with automated actions
- Detection of signatureless attacks with pre-built machine learning anomaly jobs and detection rules
Configure ELK Stack Endpoint Security
If you want to leverage such ELK security features in your environment, how can you configure ELK stack endpoint security?
In order to configure ELK stack endpoint security;
- Install and configure ELK Stack
- Install and setup ELK stack Fleet server
- Install Elastic Defend integration
- Install and enroll Elastic Agents into Fleet server
Install and configure ELK Stack
You can check our various guides on how to install and configure ELK stack.
Install ELK Stack 8 on Ubuntu 22.04/Ubuntu 20.04
Install ELK Stack 8 on Rocky Linux
Install ELK/Elastic Stack on Debian 10
Note that we are using ELK Stack 8
Install and setup ELK stack Fleet server
You can refer, to our guide on how to install and setup ELK stack Fleet server;
How to Setup ELK Stack Fleet Server
Install Elastic Defend integration
Elastic integrations provides another simple, unified way to collect log data, metrics and other form of data from popular apps and services and ingest them into Elasticsearch for processing and visualization.
Elastic Defend integration in particular, helps protect your hosts and cloud workloads with threat prevention, detection, and deep security data visibility.
To install Elastic Defend integration on ELK stack;
- Login to Kibana web interface and navigate to Management > Integrations. You should be able to see Elastic Defend listed. If not shown, just search it by typing defend or any relevant keyword on the search bar.
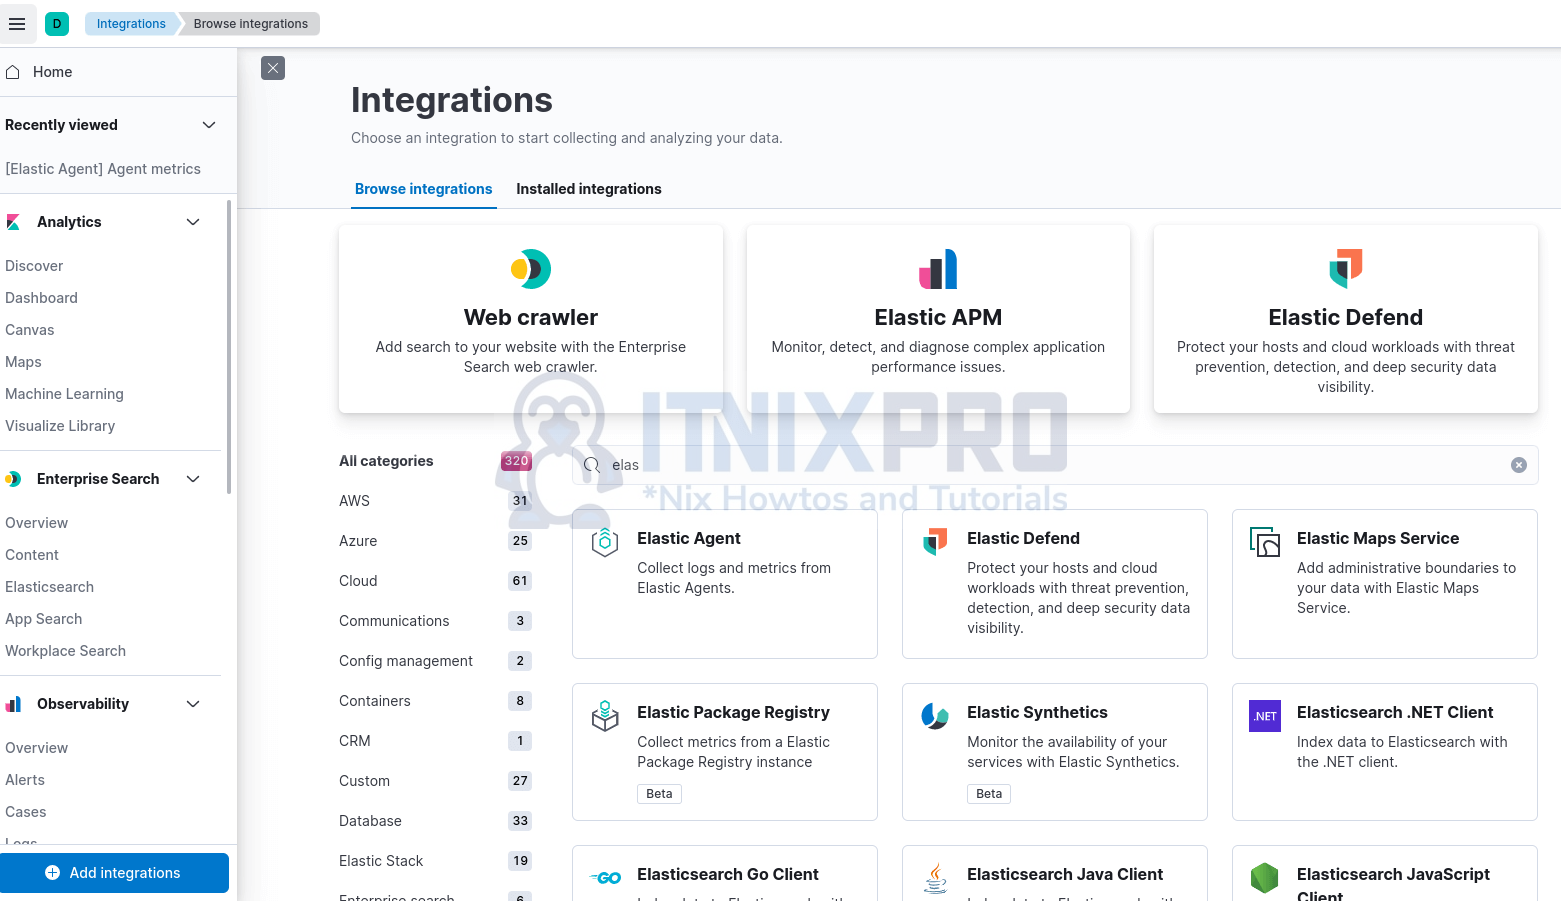
- Click Elastic Defend integration to proceed with configuration.
- On Elastic Defend integration page, click Add Elastic Defend.
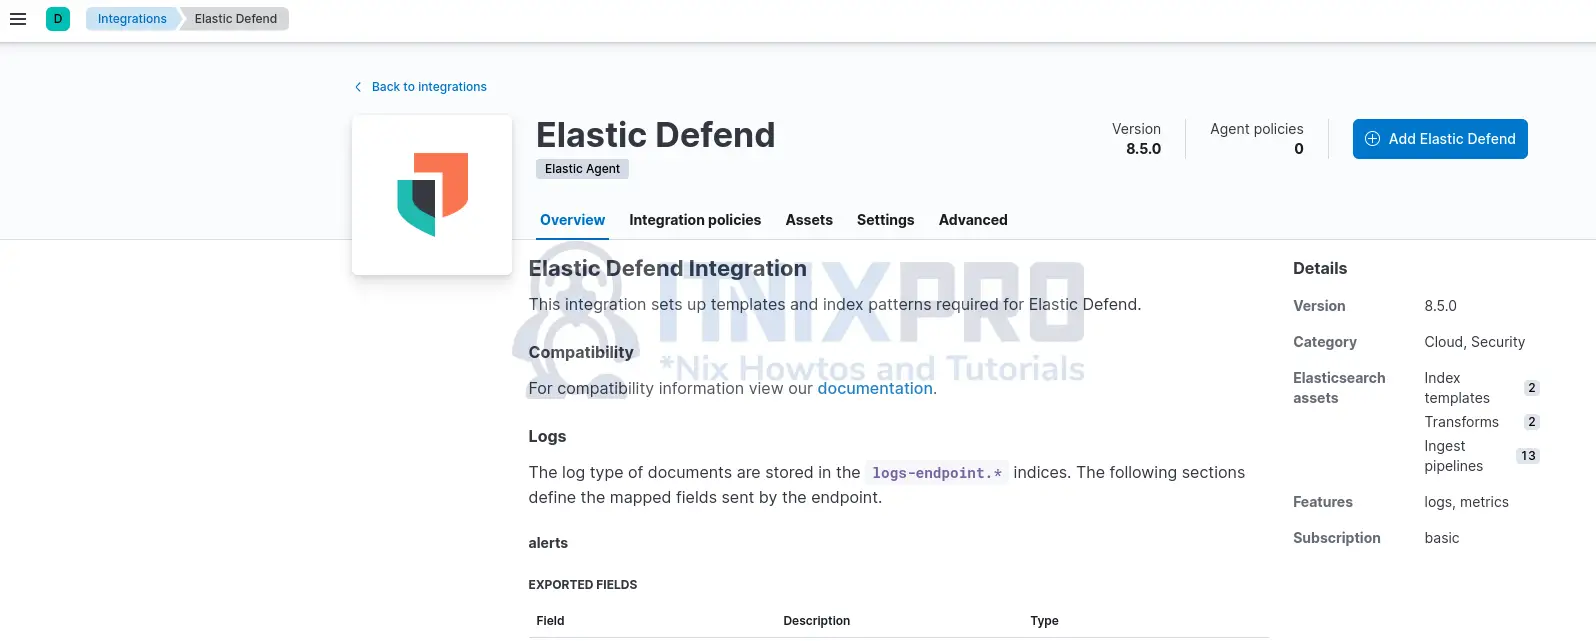
- When you click Add Elastic Defend, it opens up Elastic Defend integration configuration page.
- To configure Elastic Defend integration;
- begin by defining the name and description that can be used to identify this integration.
- Select configuration settings. We will go with Traditional Endpoints environment and Next-Generation Antivirus (NGAV) option in this demo.
- Next, choose where to add this integration. New hosts or existing hosts with a policy created. For New hosts, create new agent policy name.
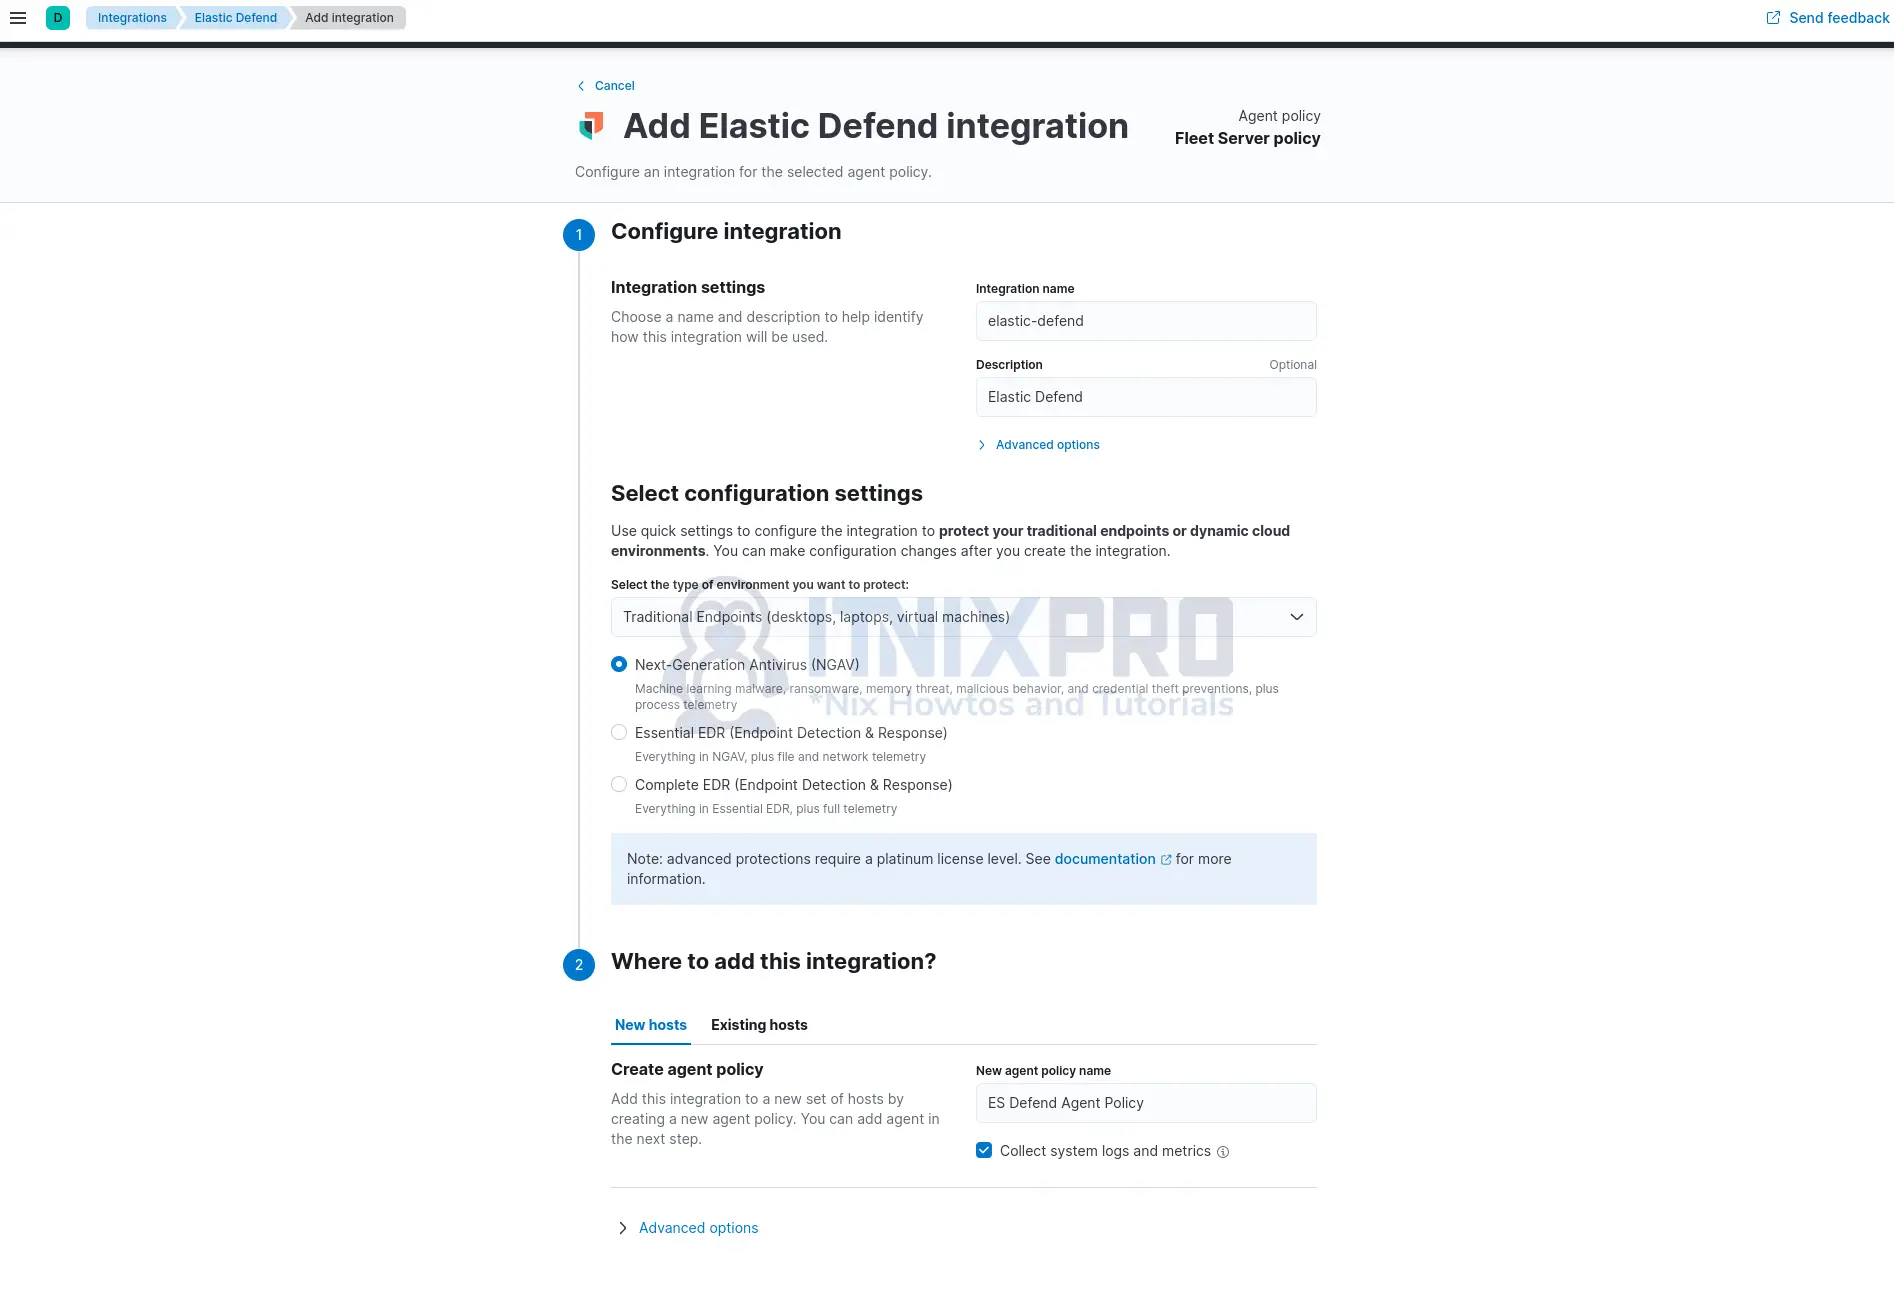
You can click on Advanced options drop to see more settings. We will go with the defaults in this guide.
Click Save and Continue to deploy and apply the changes.
Once the changes are applied, you will see Elastic Defend integration policies shown as in below screenshot;
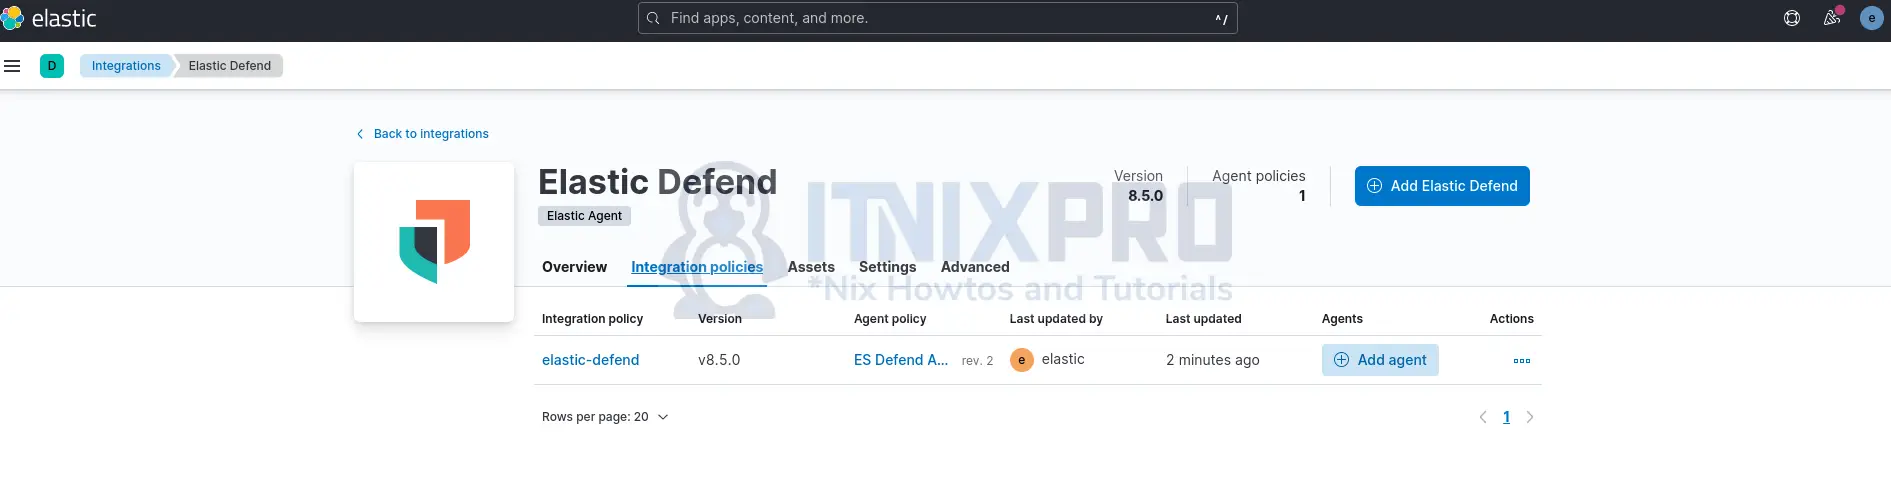
Click on the agent policy to see more Elastic Defend policy settings;
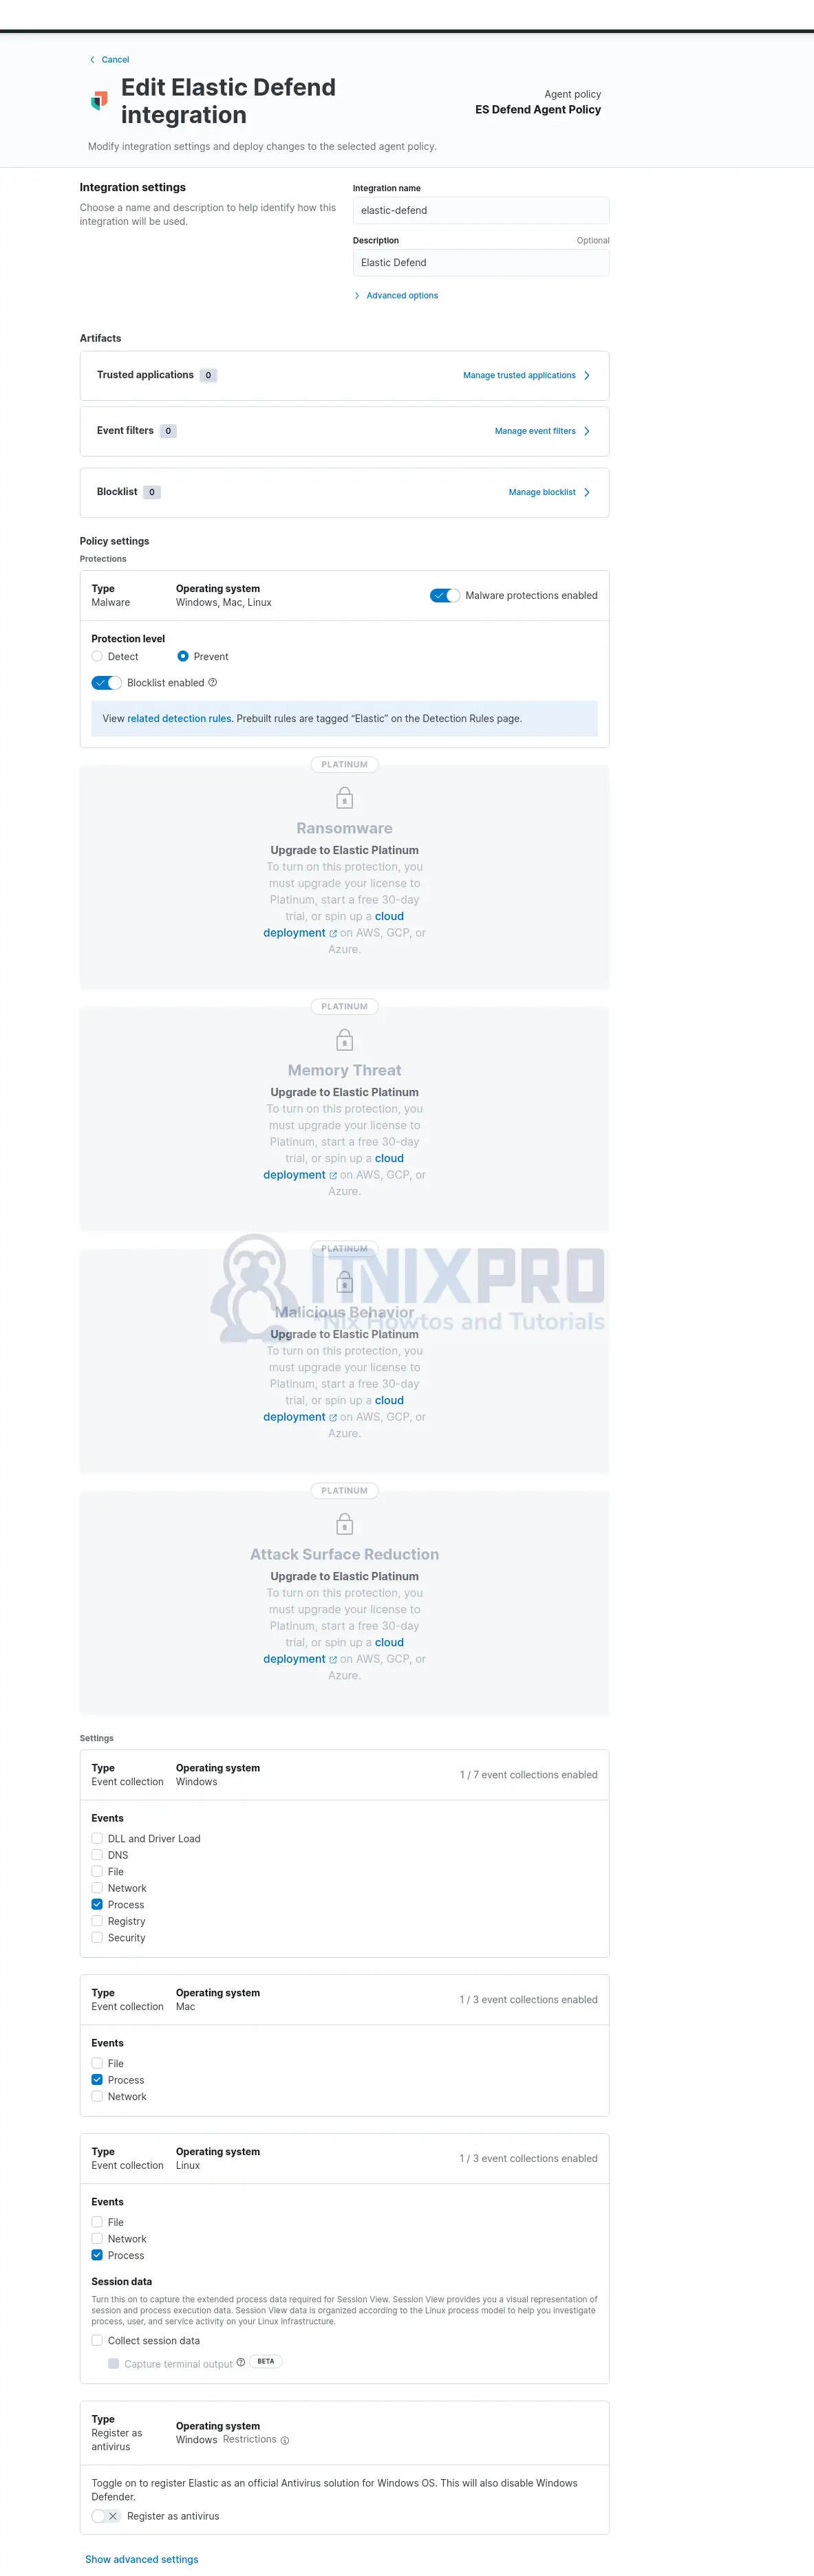
As you can see, some features require a Platinum or Enterprise license.
Install and Enroll Elastic Agents on Remote Hosts to Fleet Server
To finalize the integration, you need to install and enroll elastic agents on the remote hosts to the Elastic Fleet server to collect logs and metrics and ship them into Elasticsearch for analysis by the Elastic Defend integration.
In this demo, we have a remote Debian 10 Linux host. We will be installing Elastic Agent on this host.
To install and enroll agent on the remote host;
- Navigate to Kibana menu > Management > Fleet.
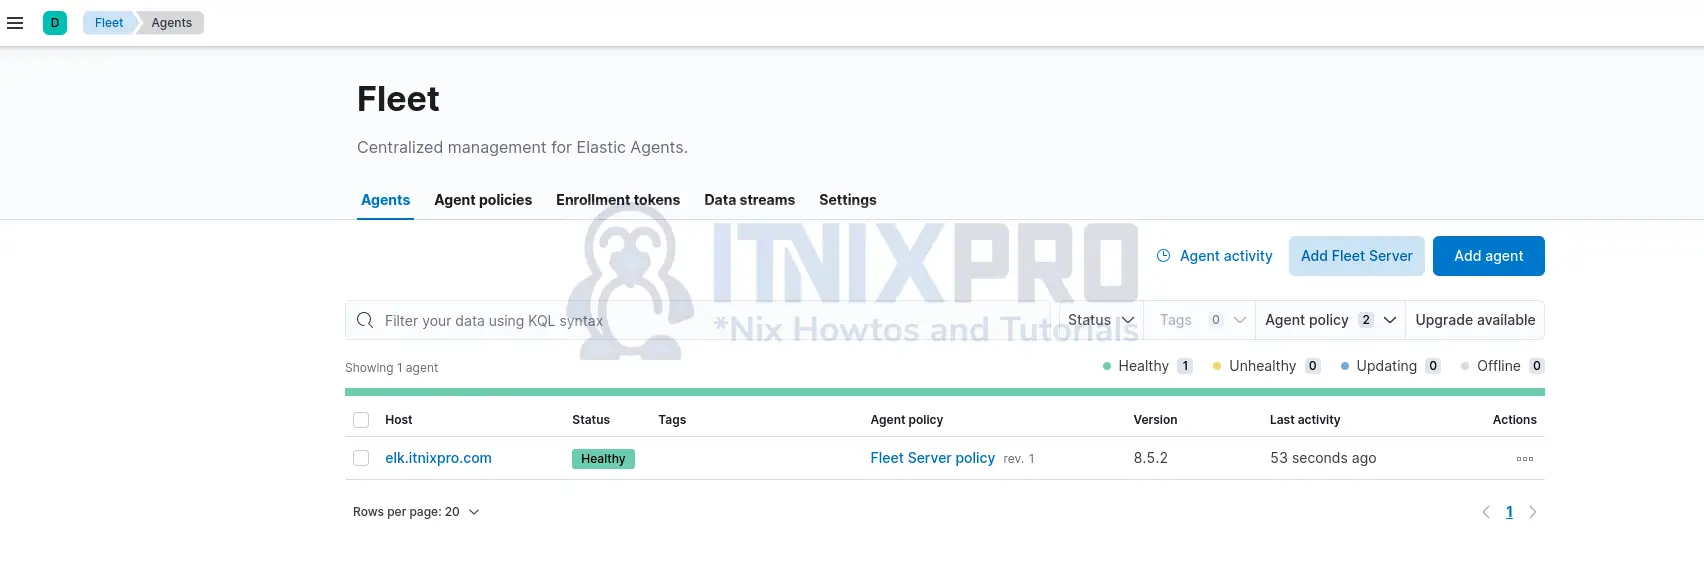
- On the Fleet interface, click click Add agent. This opens up Agent configuration page.
- Choose an agent policy for the Elastic Agent from the list. In this demo, we only have Elastic Defend policy with two associated integrations.
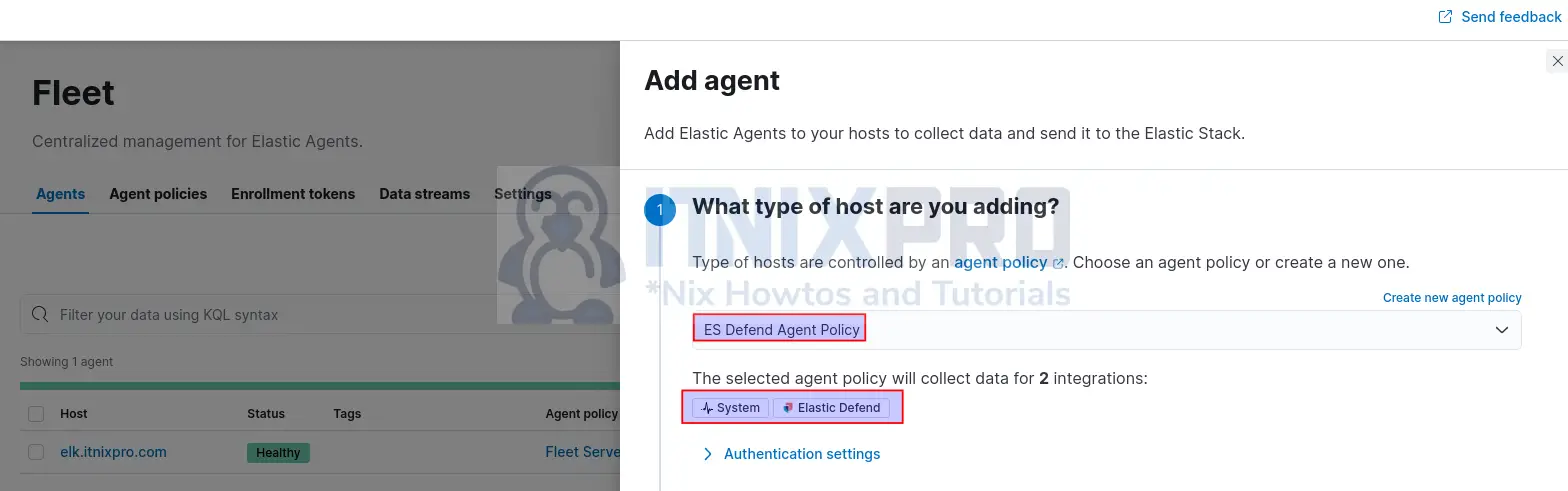
- Select the recommended method agent enrollment method, Enroll in Fleet.
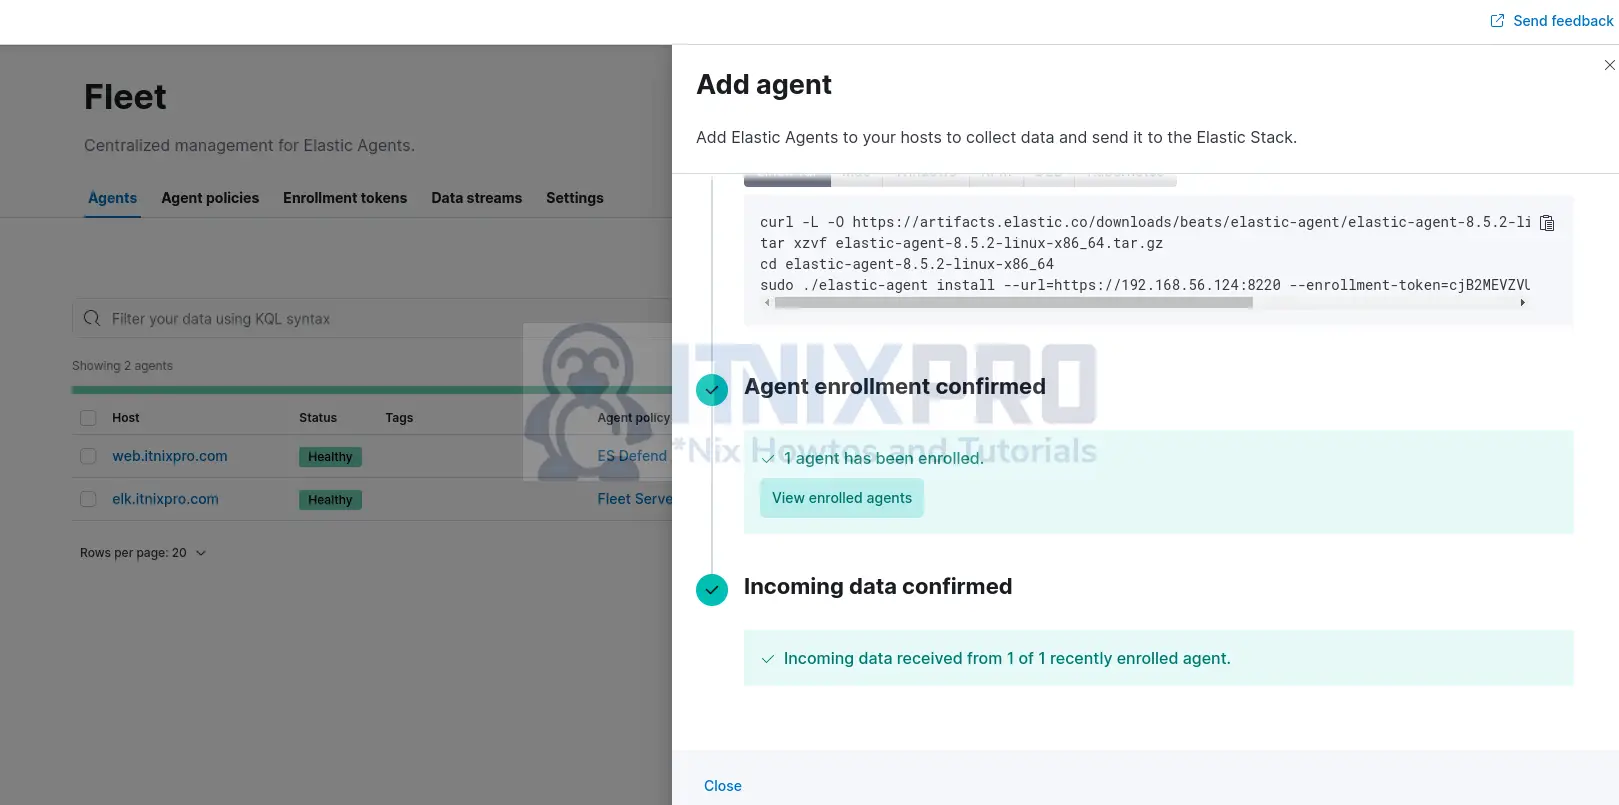
- Copy your respective host system agent enrollment command. In Linux systems, it is recommended to use Linux Tar method. This is our sample install command for Linux;
curl -L -O https://artifacts.elastic.co/downloads/beats/elastic-agent/elastic-agent-8.5.2-linux-x86_64.tar.gz
tar xzvf elastic-agent-8.5.2-linux-x86_64.tar.gz
cd elastic-agent-8.5.2-linux-x86_64
sudo ./elastic-agent install --url=https://192.168.56.124:8220 --enrollment-token=cjB2MEVZVUIxQ1FPMlRReXd2MGU6M1FMaVRqSmJTWGFCZ0pnLUlONHk2Zw==- Thus, copy the appropriate command and execute on the remote host to install and enroll the agent into the Fleet server.
- One more thing to note is if you are using a self-signed SSL certs, you need to pass the –insecure flag to the
./elastic-agent installcommand.
sudo ./elastic-agent install --url=https://192.168.56.124:8220 --enrollment-token=cjB2MEVZVUIxQ1FPMlRReXd2MGU6M1FMaVRqSmJTWGFCZ0pnLUlONHk2Zw== --insecure- When the agent installation command runs, confirm the same and proceed.
Elastic Agent will be installed at /opt/Elastic/Agent and will run as a service. Do you want to continue? [Y/n]:YSample install output;
{"log.level":"warn","@timestamp":"2022-12-14T15:00:03.884-0500","log.logger":"tls","log.origin":{"file.name":"tlscommon/tls_config.go","file.line":104},"message":"SSL/TLS verifications disabled.","ecs.version":"1.6.0"}
{"log.level":"info","@timestamp":"2022-12-14T15:00:04.714-0500","log.origin":{"file.name":"cmd/enroll_cmd.go","file.line":471},"message":"Starting enrollment to URL: https://192.168.56.124:8220/","ecs.version":"1.6.0"}
{"log.level":"warn","@timestamp":"2022-12-14T15:00:04.930-0500","log.logger":"tls","log.origin":{"file.name":"tlscommon/tls_config.go","file.line":104},"message":"SSL/TLS verifications disabled.","ecs.version":"1.6.0"}
{"log.level":"info","@timestamp":"2022-12-14T15:00:06.166-0500","log.origin":{"file.name":"cmd/enroll_cmd.go","file.line":273},"message":"Successfully triggered restart on running Elastic Agent.","ecs.version":"1.6.0"}
Successfully enrolled the Elastic Agent.
Elastic Agent has been successfully installed.
The agent is installed and started, and enabled to run on system boot;
systemctl status elastic-agent.service● elastic-agent.service - Elastic Agent is a unified agent to observe, monitor and protect your system.
Loaded: loaded (/etc/systemd/system/elastic-agent.service; enabled; vendor preset: enabled)
Active: active (running) since Wed 2022-12-14 15:00:03 EST; 2min 31s ago
Main PID: 1214 (elastic-agent)
Tasks: 39 (limit: 2359)
Memory: 620.6M
CGroup: /system.slice/elastic-agent.service
├─1214 elastic-agent
├─1246 /opt/Elastic/Agent/data/elastic-agent-c13f91/install/metricbeat-8.5.2-linux-x86_64/metricbeat -E setup.ilm.enabled=false -E setup.template.enabled=false -
├─1374 /opt/Elastic/Agent/data/elastic-agent-c13f91/install/filebeat-8.5.2-linux-x86_64/filebeat -E setup.ilm.enabled=false -E setup.template.enabled=false -E ma
├─1379 /opt/Elastic/Agent/data/elastic-agent-c13f91/install/filebeat-8.5.2-linux-x86_64/filebeat -E setup.ilm.enabled=false -E setup.template.enabled=false -E ma
└─1386 /opt/Elastic/Agent/data/elastic-agent-c13f91/install/metricbeat-8.5.2-linux-x86_64/metricbeat -E setup.ilm.enabled=false -E setup.template.enabled=false -
Dec 14 15:00:04 web.itnixpro.com elastic-agent[1214]: {"log.level":"info","@timestamp":"2022-12-14T15:00:04.619-0500","log.origin":{"file.name":"stateresolver/stateresolver
Dec 14 15:00:06 web.itnixpro.com elastic-agent[1214]: {"log.level":"info","@timestamp":"2022-12-14T15:00:06.165-0500","log.origin":{"file.name":"cmd/run.go","file.line":250
Dec 14 15:00:06 web.itnixpro.com elastic-agent[1214]: {"log.level":"info","@timestamp":"2022-12-14T15:00:06.165-0500","log.origin":{"file.name":"cmd/run.go","file.line":266
Dec 14 15:00:06 web.itnixpro.com elastic-agent[1214]: {"log.level":"info","@timestamp":"2022-12-14T15:00:06.165-0500","log.origin":{"file.name":"operation/operator.go","fil
Dec 14 15:00:06 web.itnixpro.com elastic-agent[1214]: {"log.level":"info","@timestamp":"2022-12-14T15:00:06.182-0500","log.origin":{"file.name":"artifact/config.go","file.l
Dec 14 15:00:06 web.itnixpro.com elastic-agent[1214]: {"log.level":"info","@timestamp":"2022-12-14T15:00:06.182-0500","log.origin":{"file.name":"operation/operator.go","fil
Dec 14 15:00:06 web.itnixpro.com elastic-agent[1214]: {"log.level":"info","@timestamp":"2022-12-14T15:00:06.183-0500","log.origin":{"file.name":"stateresolver/stateresolver
Dec 14 15:00:06 web.itnixpro.com elastic-agent[1214]: {"log.level":"info","@timestamp":"2022-12-14T15:00:06.183-0500","log.origin":{"file.name":"stateresolver/stateresolver
Dec 14 15:00:06 web.itnixpro.com elastic-agent[1214]: {"log.level":"error","@timestamp":"2022-12-14T15:00:06.183-0500","log.origin":{"file.name":"emitter/controller.go","fi
Dec 14 15:00:06 web.itnixpro.com elastic-agent[1214]: {"log.level":"info","@timestamp":"2022-12-14T15:00:06.184-0500","log.origin":{"file.name":"process/app.go","file.line
- Upon successful agent installation/enrollment, you should see the agent enrollment and incoming data status confirmed on the server;
You can now close the agent enrollment wizard.
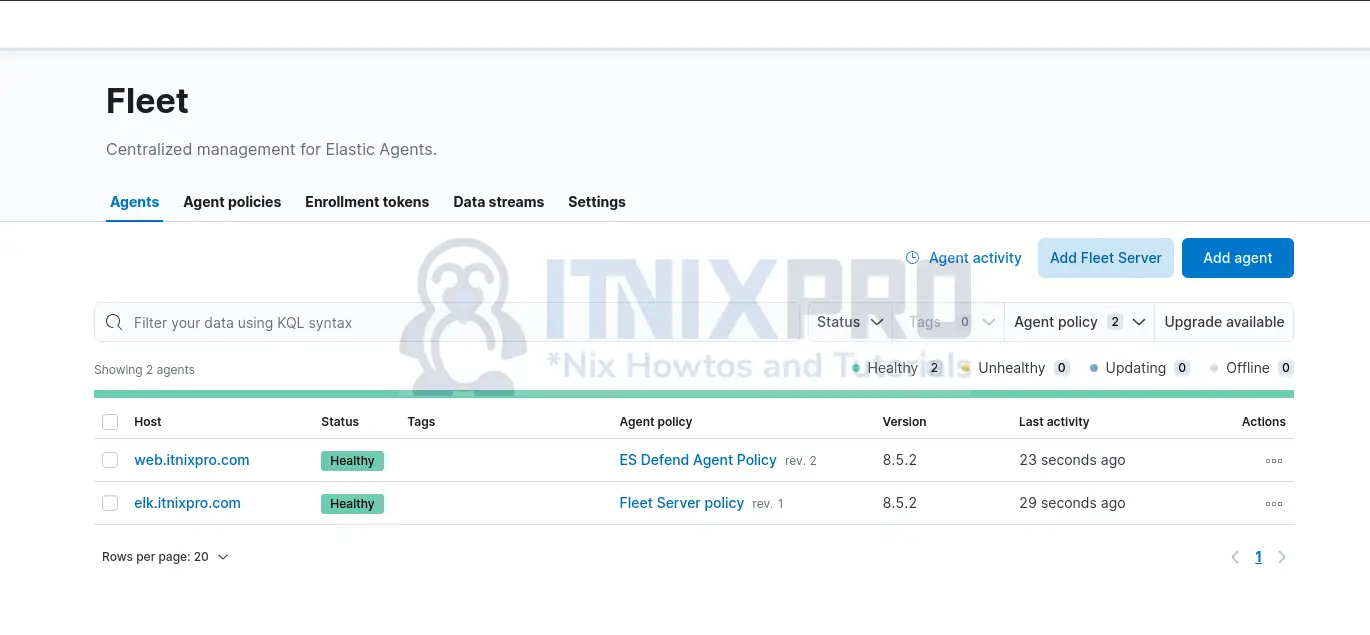
You can click on the agent to view more details.
That marks the end of our guide on how to configure ELK stack Endpoint security.
Stay tuned for more tutorials around Elastic Endpoint security.
More Tutorials
Create Data Map Visualization in Kibana