
In this tutorial, you will learn how to install Minikube on Ubuntu 24.04. There are several ways in which you can run a Kubernetes cluster in your local system for practice. One of the ways include using Minikube. Thus, follow through this guide to learn how to install Minikube on Ubuntu.
Table of Contents
Install Minikube on Ubuntu 24.04
Minimum System Requirements to Run Minikube
There are minimum system hardware requirements required to run Minikube. These requirements are well outlined in the getting started page. These include;
- At least 2 CPUs
- At least 2GB free RAM
- At least 20GB of free disk space
Install Minikube Driver (Docker Engine)
Minikube can be run as a container, a virtual machine or on a bare-metal.
To run as a container, then you need container orchestration tool installed on your system. You can use Docker engine or Podman. Docker is more preferred as Podman is still considered experimental.
To run as VM, then you need either KVM, Qemu or VirtualBox (usually the default) installed on your system.
We will be using Docker engine as Minikube driver in this guide. Therefore, run the command below to install Docker engine on Ubuntu 24.04.
Run system package cache update and install some required packages
sudo apt updatesudo apt install ca-certificates curl gnupg2Install Docker engine repositories;
curl -fsSL https://download.docker.com/linux/ubuntu/gpg | sudo gpg --dearmor -o /etc/apt/trusted.gpg.d/docker.gpgecho "deb [arch=amd64] https://download.docker.com/linux/ubuntu noble stable" | sudo tee -a /etc/apt/sources.list.d/docker.listThe install Docker engine on Ubuntu 24.04.
sudo apt updatesudo apt install docker-ce docker-ce-cli containerd.io docker-buildx-plugin docker-compose-pluginIf you are running Docker/or managing K8s cluster as non root user account, you can add that user to the docker group so that you can be able to run Docker commands without being prompted to elevate your rights.
Before that, create the docker group.
newgrp dockerFor example, to add my user account to Docker group;
sudo usermod -aG docker itnixproReplace itnixpro with your respective username.
Once you do that, log out and re-login as that user for the changes to take effect.
Confirm the user is in Docker group;
groups itnixproitnixpro : itnixpro sudo dockerDocker should already be started and running.
systemctl status dockerInstall Minikube on Ubuntu 24.04
You can now proceed to install Minikube.
You can install Minikube using either a binary or Debian package. We will use Debian package in this guide.
Thus, run the command below to download latest release version of Minikube debian package.
curl -LO https://storage.googleapis.com/minikube/releases/latest/minikube_latest_amd64.debThen install it.
sudo apt install ./minikube_latest_amd64.deb -yOnce the installation is done, you should now be ready to run a K8s cluster.
You can verify Minikube installation by checking the installed version.
minikube versionminikube version: v1.32.0
commit: 8220a6eb95f0a4d75f7f2d7b14cef975f050512dGet help on various minikube command line options;
minikube --helpRunning Kubernetes Cluster using Minikube
You should now be able to start a Kubernetes cluster with Minikube on Ubuntu 24.04.
To start a single node cluster, run the command below;
minikube start --driver=dockerThis command starts a Kubernetes cluster with Docker driver.
Remember, VirtualBox is the default driver, so if you run minikube start without specifying the driver, VirtualBox will be used.
You can set Docker as the default Minikube driver using the command below;
minikube config set driver dockerIf you had an already running cluster before this change, then you have to delete the cluster;
minikube delete --allAnd then start a new cluster using the Docker engine! If you are running cluster as non root user with Docker driver, ensure the user has rights to run Docker by adding the user to Docker group, as shown above.
minikube startSample minikube cluster initialization output;
😄  minikube v1.32.0 on Ubuntu 24.04
✨  Using the docker driver based on user configuration
📌  Using Docker driver with root privileges
👍  Starting control plane node minikube in cluster minikube
🚜  Pulling base image ...
🔥  Creating docker container (CPUs=2, Memory=2200MB) ...
🐳  Preparing Kubernetes v1.28.3 on Docker 24.0.7 ...
    ▪ Generating certificates and keys ...
    ▪ Booting up control plane ...
    ▪ Configuring RBAC rules ...
🔗  Configuring bridge CNI (Container Networking Interface) ...
    ▪ Using image gcr.io/k8s-minikube/storage-provisioner:v5
🔎  Verifying Kubernetes components...
🌟  Enabled addons: storage-provisioner, default-storageclass
💡  kubectl not found. If you need it, try: 'minikube kubectl -- get pods -A'
🏄  Done! kubectl is now configured to use "minikube" cluster and "default" namespace by default
Since we are using Docker driver, Minikube will spawn a minikube container.
docker psCONTAINER ID IMAGE COMMAND CREATED STATUS PORTS NAMES 6a17dd32a253 gcr.io/k8s-minikube/kicbase:v0.0.42 "/usr/local/bin/entr…" 12 minutes ago Up 29 seconds 127.0.0.1:32777->22/tcp, 127.0.0.1:32776->2376/tcp, 127.0.0.1:32775->5000/tcp, 127.0.0.1:32774->8443/tcp, 127.0.0.1:32773->32443/tcp minikube
Minikube Cluster Basic Controls
Minikube ships with various command line options that let you interact with your cluster in various ways.
Some of the basic commands include;
- start: Starts a local Kubernetes cluster
- status: Gets the status of a local Kubernetes cluster
- stop: Stops a running local Kubernetes cluster
- delete: Deletes a local Kubernetes cluster
- dashboard: Access the Kubernetes dashboard running within the minikube cluster
- pause: Pause Kubernetes
- unpause: Unpause Kubernetes
You have already started single cluster Minikube cluster above, with start command.
To check the status of the Minikube local Kuberenetes cluster;
minikube statusSample output;
minikube
type: Control Plane
host: Running
kubelet: Running
apiserver: Running
kubeconfig: Configured
You can pass –help to see more status options
minikube status --helpTo stop the Minikube kubernetes cluster;
minikube stopThe stop command stops ONLY the underlying clustr VM or container, but keeps user data intact. The cluster can be started again with the “start” command.
✋  Stopping node "minikube"  ...
🛑  Powering off "minikube" via SSH ...
🛑  1 node stopped.
To delete a local Kubernetes cluster;
minikube delete
To delete all local Minikube Kubernetes clusters and profiles
minikube delete --allFor more Minikube commands, run;
minikube --helpManaging Minikube Kubernetes Cluster from Kubernetes Dashboard
Minikube supports Kubernetes dashboard. Kubernetes dashboard allows you to manage your cluster from a web user interface.
To enable Minikube Kubernetes dashboard, you can use the dashboard option.
The dashboard option is one of the many Minikube add-ons that provide or add more functionality to the Minikube cluster.
You can list add-ons using the command;
minikube addons listSome addons are enabled and most are disabled.
|-----------------------------|----------|--------------|--------------------------------|
|         ADDON NAME          | PROFILE  |    STATUS    |           MAINTAINER           |
|-----------------------------|----------|--------------|--------------------------------|
| ambassador                  | minikube | disabled     | 3rd party (Ambassador)         |
| auto-pause                  | minikube | disabled     | minikube                       |
| cloud-spanner               | minikube | disabled     | Google                         |
| csi-hostpath-driver         | minikube | disabled     | Kubernetes                     |
| dashboard                   | minikube | disabled     | Kubernetes                     |
| default-storageclass        | minikube | enabled ✅   | Kubernetes                     |
| efk                         | minikube | disabled     | 3rd party (Elastic)            |
| freshpod                    | minikube | disabled     | Google                         |
| gcp-auth                    | minikube | disabled     | Google                         |
| gvisor                      | minikube | disabled     | minikube                       |
| headlamp                    | minikube | disabled     | 3rd party (kinvolk.io)         |
| helm-tiller                 | minikube | disabled     | 3rd party (Helm)               |
| inaccel                     | minikube | disabled     | 3rd party (InAccel             |
|                             |          |              | [[email protected]])            |
| ingress                     | minikube | disabled     | Kubernetes                     |
| ingress-dns                 | minikube | disabled     | minikube                       |
| inspektor-gadget            | minikube | disabled     | 3rd party                      |
|                             |          |              | (inspektor-gadget.io)          |
| istio                       | minikube | disabled     | 3rd party (Istio)              |
| istio-provisioner           | minikube | disabled     | 3rd party (Istio)              |
| kong                        | minikube | disabled     | 3rd party (Kong HQ)            |
| kubeflow                    | minikube | disabled     | 3rd party                      |
| kubevirt                    | minikube | disabled     | 3rd party (KubeVirt)           |
| logviewer                   | minikube | disabled     | 3rd party (unknown)            |
| metallb                     | minikube | disabled     | 3rd party (MetalLB)            |
| metrics-server              | minikube | disabled     | Kubernetes                     |
| nvidia-device-plugin        | minikube | disabled     | 3rd party (NVIDIA)             |
| nvidia-driver-installer     | minikube | disabled     | 3rd party (Nvidia)             |
| nvidia-gpu-device-plugin    | minikube | disabled     | 3rd party (Nvidia)             |
| olm                         | minikube | disabled     | 3rd party (Operator Framework) |
| pod-security-policy         | minikube | disabled     | 3rd party (unknown)            |
| portainer                   | minikube | disabled     | 3rd party (Portainer.io)       |
| registry                    | minikube | disabled     | minikube                       |
| registry-aliases            | minikube | disabled     | 3rd party (unknown)            |
| registry-creds              | minikube | disabled     | 3rd party (UPMC Enterprises)   |
| storage-provisioner         | minikube | enabled ✅   | minikube                       |
| storage-provisioner-gluster | minikube | disabled     | 3rd party (Gluster)            |
| storage-provisioner-rancher | minikube | disabled     | 3rd party (Rancher)            |
| volumesnapshots             | minikube | disabled     | Kubernetes                     |
|-----------------------------|----------|--------------|--------------------------------|
You can control the addons using the commands as outlined in the help page;
minikube addons --helpTo see the usage and other dashboard options;
minikube dashboard --helpAccess the Kubernetes dashboard running within the minikube cluster
Options:
--port=0:
Exposed port of the proxyfied dashboard. Set to 0 to pick a random port.
--url=false:
Display dashboard URL instead of opening a browser
Usage:
minikube dashboard [flags] [options]
Use "minikube options" for a list of global command-line options (applies to all commands).
Launch Minikube dashboard;
minikube dashboardThis will enable the dashboard addon, if not already enabled, and launch it.
🔌  Enabling dashboard ...
    ▪ Using image docker.io/kubernetesui/dashboard:v2.7.0
    ▪ Using image docker.io/kubernetesui/metrics-scraper:v1.0.8
💡  Some dashboard features require the metrics-server addon. To enable all features please run:

	minikube addons enable metrics-server


🤔  Verifying dashboard health ...
🚀  Launching proxy ...
    > kubectl.sha256:  64 B / 64 B [-------------------------] 100.00% ? p/s 0s
    > kubectl:  47.56 MiB / 47.56 MiB [----------] 100.00% 195.28 MiB p/s 400ms
🤔  Verifying proxy health ...
🎉  Opening http://127.0.0.1:41081/api/v1/namespaces/kubernetes-dashboard/services/http:kubernetes-dashboard:/proxy/ in your default browser...
👉  http://127.0.0.1:41081/api/v1/namespaces/kubernetes-dashboard/services/http:kubernetes-dashboard:/proxy/
Note that, the dashboard address provided is only accessible within the local system where Minikube is running.
If you are running a non-desktop system, this might be a challenge to access the dashboard.
Therefore, to enable remote access to the dashboard, you have to proxy the access. For example, you can use kubectl command to create a proxy.
Minikube ships with an internal kubectl, which is accessible;
minikube kubectl -- <options>Do, minikube kubectl — –help for more options.
Press CTRL+C on the dashboard command and launch Kubernetes API server proxy;
minikube kubectl -- proxyThis will start proxy on a localhost on port 8001/TCP (Starting to serve on 127.0.0.1:8001). If you take this approach, you will need to create a local port forwarding from your host to reach the dashboard.
However, you can set the proxy to listen on all interfaces using –address option.
minikube kubectl -- proxy --address='0.0.0.0'Similarly, you need to allow all hosts to access the dashboard, hence pass the option, –accept-hosts=”^.*$”. Otherwise, you may get Forbidden access on accessing the dashboard.
So, your command now looks like;
minikube kubectl -- proxy --address='0.0.0.0' --accept-hosts="^.*$"For a wide list of options you can use, consult, kubectl proxy –help.
You should now be able to access your Minikube Kubernetes dashboard with the IP address the Minikube server.
For example, the dashboard address;
http://127.0.0.1:41081/api/v1/namespaces/kubernetes-dashboard/services/http:kubernetes-dashboard:/proxy/Now changes to (on browser);
http://192.168.56.111:8001/api/v1/namespaces/kubernetes-dashboard/services/http:kubernetes-dashboard:/proxy/Where, 192.168.56.111 is the IP address of the remote Minikube server where dashboard is running.
Ensure you open the port on firewall if you are running system level firewall.
Then access access the dashboard using your respective URL.
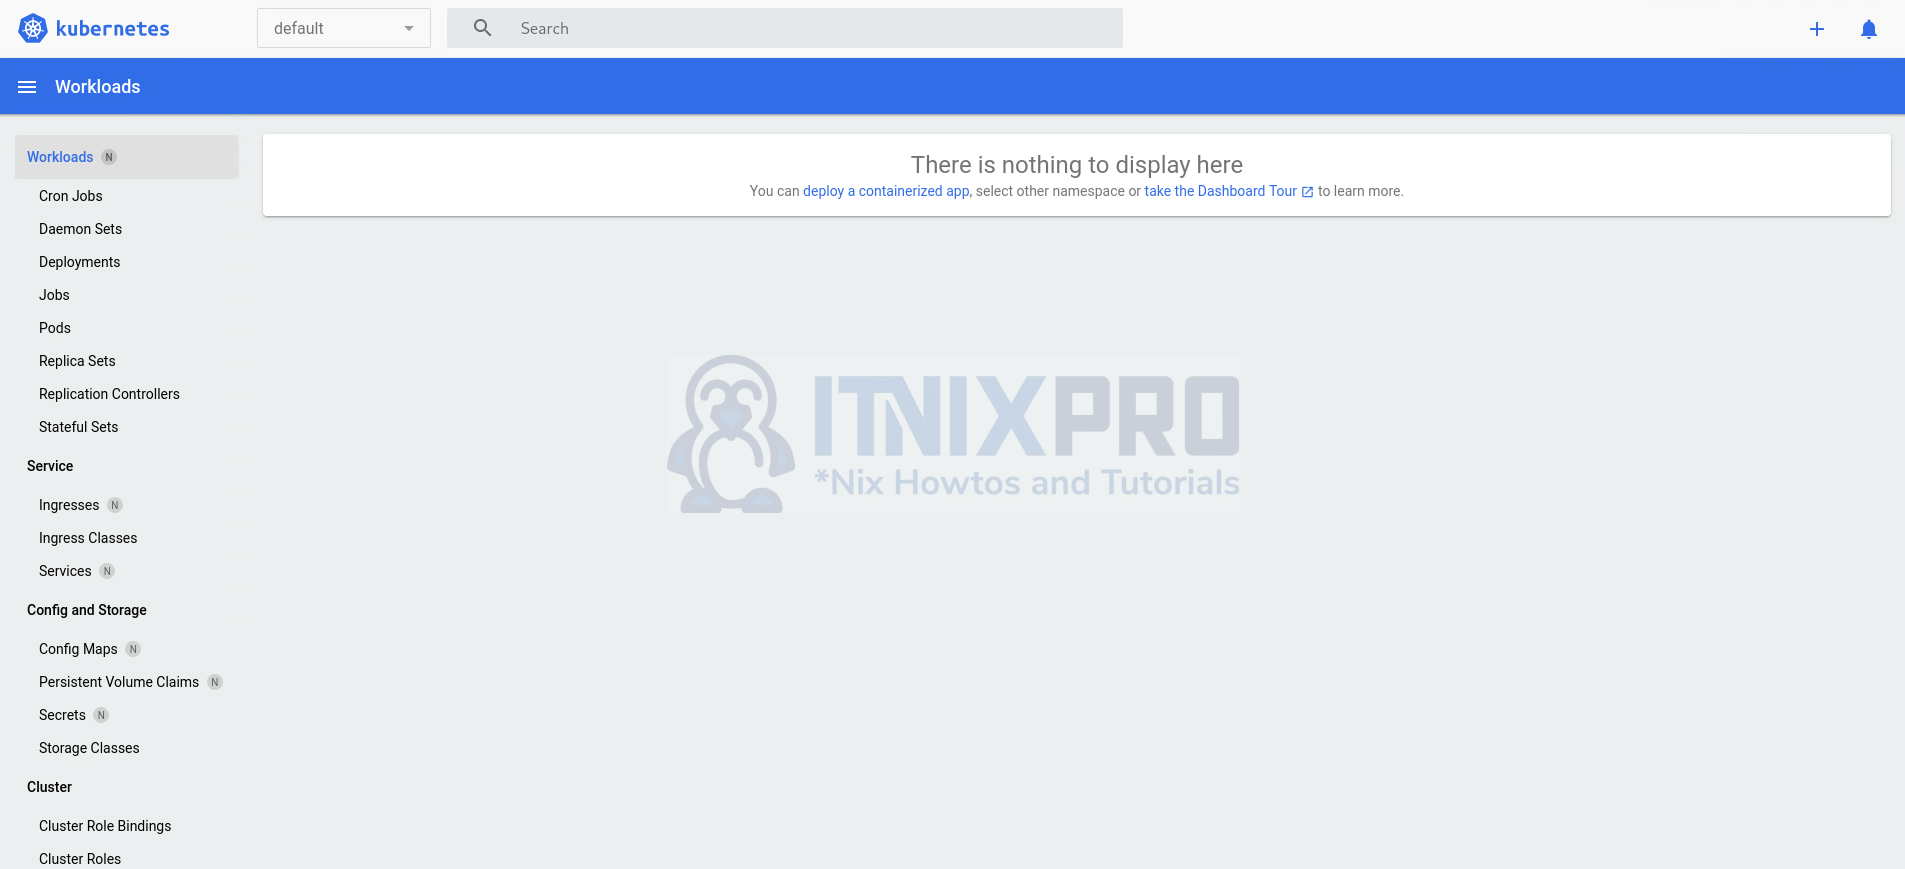
Currently, we have not deployed any apps and that is the default view of a Minikube Kubernetes cluster without any app deployed on the default namespaces.
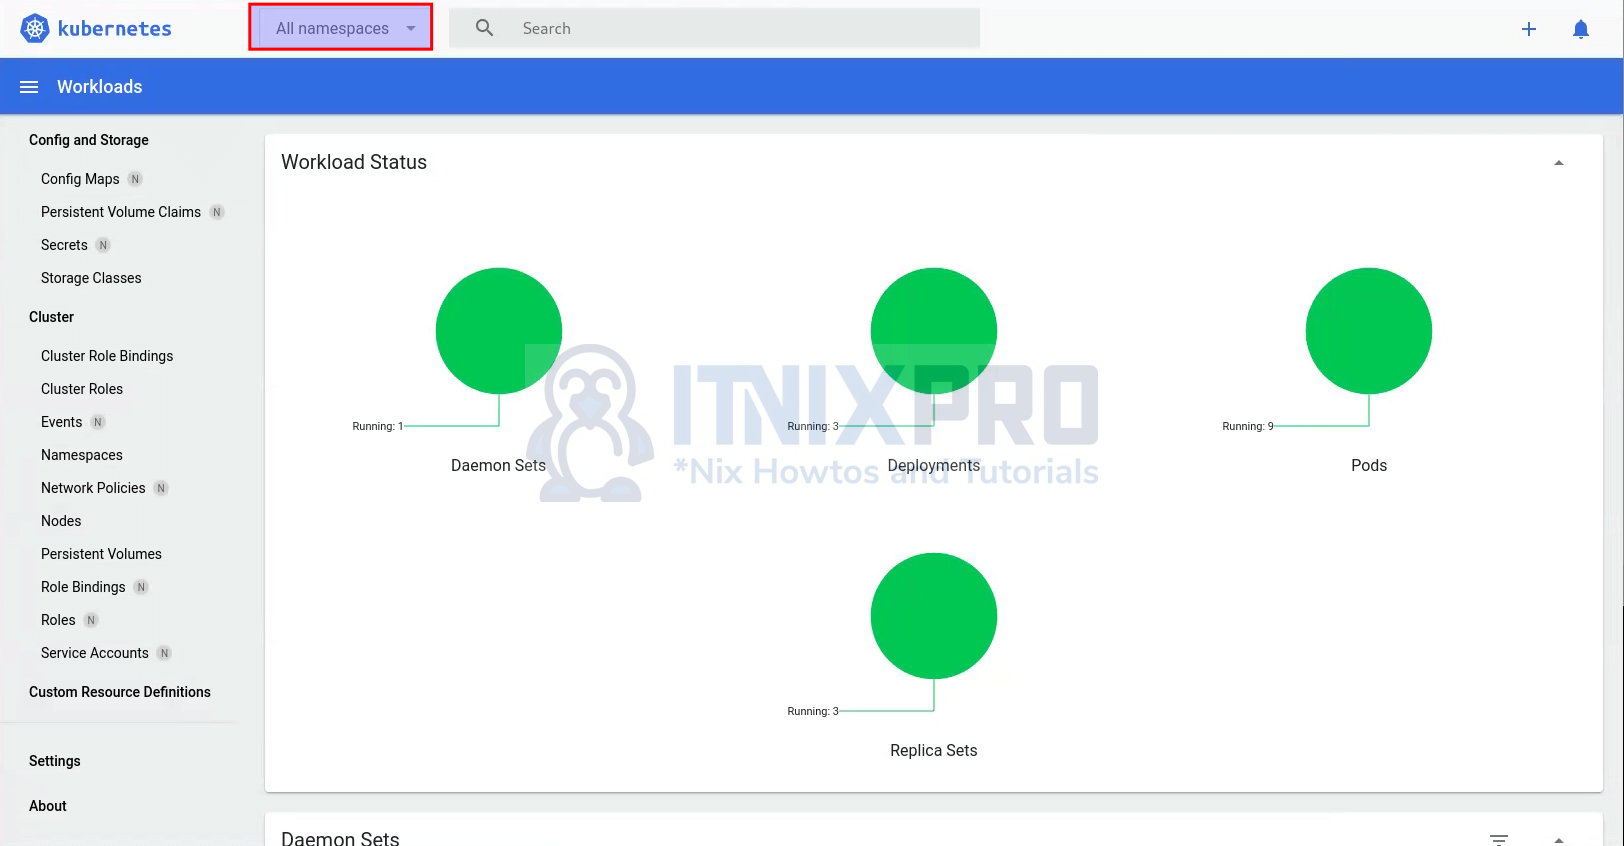
You can select other available namespaces from the drop down button at the top left side to check system application/services.
Refer to the official documentation for more information on how to use Minikube Kubernetes dashboard.
Deploying Simple App on Minikube
So, what are the steps to deploy an app on Minikube? Basically, there are a number of steps that you can take to deploy an app on Minikube Kubernetes cluster.
Containerize the Application
To begin with, you need to containerize your application using Docker. You can create a Dockerfile that defines the Docker images to use in your application, the application source code and all dependencies required by your app.
In this basic example, we will use the default Apache Docker image to create a basic Apache web app.
Create Kubernetes Application Deployment Resource
In Kubernetes, a deployment is a resource object that defines a desired state of an application.
According to Kubernetes page;
A Deployment provides declarative updates for Pods and ReplicaSets.
You describe a desired state in a Deployment, and the Deployment Controller changes the actual state to the desired state at a controlled rate. You can define Deployments to create new ReplicaSets, or to remove existing Deployments and adopt all their resources with new Deployments.
A deployment will define such details as;
- application container name
- docker image to use
- the application ports to expose
- the number of application replicas
- etc …
See our sample Apache web app deployment resource.
cat apache-deployment.yamlapiVersion: apps/v1
kind: Deployment
metadata:
name: apache-deployment
spec:
replicas: 1
selector:
matchLabels:
app: apache
template:
metadata:
labels:
app: apache
spec:
containers:
- name: apache-container
image: httpd
ports:
- containerPort: 80
Create Kubernetes Application Service Resource
In Kubernetes, a service is a resource object that defines how a Kubernetes application (Pods) is exposed over the network.
A service resource specifies details such as:
- the name of the service resource
- the pods/applications to be exposed
- the port and protocol that the exposed port will listen on
- the internal application port to be exposed
- the type of the service which can be one of:
- ClusterIP: exposes the application on an IP that is ONLY accessible within the cluster.
- NodePort: exposes the application on a static port on each Node’s IP.
LoadBalancer: This is the standard way to expose a K8s app to the Internet. This type creates an external load balancer with a single IP address that forwards all external app requests to your backend Pods. Accorrding to Kubernetes page, “Kubernetes does not directly offer a load balancing component; you must provide one, or you can integrate your Kubernetes cluster with a cloud provider.“- ExternalName: maps a service to a DNS name.
Here is our sample service resource to expose our simple apache web app.
cat apache-service.yamlapiVersion: v1
kind: Service
metadata:
name: apache-service
spec:
selector:
app: apache
ports:
- protocol: TCP
port: 80
targetPort: 80
type: NodePort
Create the Application Resources
We now have the application deployment and service manifests. To create a Kubernetes app using these manifests, you need to apply them.
Apply the deployment manifest;
minikube kubectl -- apply -f apache-deployment.yamlThis will create the deployment in the default namespace.
minikube kubectl -- get deploymentNAME READY UP-TO-DATE AVAILABLE AGE
apache-deployment 1/1 1 1 70s
Check the pods;
minikube kubectl -- get podsNAME READY STATUS RESTARTS AGE
apache-deployment-5885c9f8d6-4srsx 1/1 Running 0 116s
Get details about the Pod;
minikube kubectl -- describe pod apache-deployment-5885c9f8d6-4srsxName: apache-deployment-5885c9f8d6-4srsx
Namespace: default
Priority: 0
Service Account: default
Node: minikube/192.168.49.2
Start Time: Wed, 27 Mar 2024 17:54:08 +0000
Labels: app=apache
pod-template-hash=5885c9f8d6
Annotations:
Status: Running
IP: 10.244.0.5
IPs:
IP: 10.244.0.5
Controlled By: ReplicaSet/apache-deployment-5885c9f8d6
Containers:
apache-container:
Container ID: docker://a114d2440a385188a307cd43386b75a4d40d665b2f741d8c00372f7cf617af18
Image: httpd
Image ID: docker-pullable://httpd@sha256:374766f5bc5977c9b72fdb8ae3ed05b7fc89060e7edc88fcbf142d6988e58eeb
Port: 80/TCP
Host Port: 0/TCP
State: Running
Started: Wed, 27 Mar 2024 17:54:14 +0000
Ready: True
Restart Count: 0
Environment:
Mounts:
/var/run/secrets/kubernetes.io/serviceaccount from kube-api-access-dvrqg (ro)
Conditions:
Type Status
Initialized True
Ready True
ContainersReady True
PodScheduled True
Volumes:
kube-api-access-dvrqg:
Type: Projected (a volume that contains injected data from multiple sources)
TokenExpirationSeconds: 3607
ConfigMapName: kube-root-ca.crt
ConfigMapOptional:
DownwardAPI: true
QoS Class: BestEffort
Node-Selectors:
Tolerations: node.kubernetes.io/not-ready:NoExecute op=Exists for 300s
node.kubernetes.io/unreachable:NoExecute op=Exists for 300s
Events:
Type Reason Age From Message
---- ------ ---- ---- -------
Normal Scheduled 2m45s default-scheduler Successfully assigned default/apache-deployment-5885c9f8d6-4srsx to minikube
Normal Pulling 2m44s kubelet Pulling image "httpd"
Normal Pulled 2m39s kubelet Successfully pulled image "httpd" in 4.954s (4.954s including waiting)
Normal Created 2m39s kubelet Created container apache-container
Normal Started 2m39s kubelet Started container apache-container
Apply the service manifest to expose the application.
minikube kubectl -- apply -f apache-service.yamlAccessing the Minikube Application
Check the services;
minikube kubectl -- get svcNAME TYPE CLUSTER-IP EXTERNAL-IP PORT(S) AGE
apache-service NodePort 10.111.139.66 80:31524/TCP 19s
kubernetes ClusterIP 10.96.0.1 443/TCP 21h
As you can see, our apache service is exposing application internal port 80/TCP on the host node on port 31524/TCP.
Get the node details about the service;
minikube kubectl -- get nodes -o wideNAME STATUS ROLES AGE VERSION INTERNAL-IP EXTERNAL-IP OS-IMAGE KERNEL-VERSION CONTAINER-RUNTIME
minikube Ready control-plane 22h v1.28.3 192.168.49.2 Ubuntu 22.04.3 LTS 6.6.0-14-generic docker://24.0.7
The node is listening on an internal IP, 192.168.49.2, which is the Minikube IP;
minikube ip192.168.49.2This is an IP address in the bridge network interface created by Minikube.
docker network lsNETWORK ID NAME DRIVER SCOPE
6cb528236710 bridge bridge local
c85b2d45669b host host local
5d993ca8a5f6 minikube bridge local
d20dcc4fdbf0 none null local
docker network inspect minikube[
{
"Name": "minikube",
"Id": "5d993ca8a5f692a21cdbddb43b9c44e835ad5ab84899417719a97eb762d47507",
"Created": "2024-03-26T20:38:07.124963456Z",
"Scope": "local",
"Driver": "bridge",
"EnableIPv6": false,
"IPAM": {
"Driver": "default",
"Options": {},
"Config": [
{
"Subnet": "192.168.49.0/24",
"Gateway": "192.168.49.1"
}
]
},
"Internal": false,
"Attachable": false,
"Ingress": false,
"ConfigFrom": {
"Network": ""
},
"ConfigOnly": false,
"Containers": {
"0b37aa39099315f02aae49c6fec749a0ca9a7fab59bde6434c67c4e04c776877": {
"Name": "minikube",
"EndpointID": "afb02ec18de0ab9058f7b6d933659e08058e427d6d48ffa81022ab07197db8ed",
"MacAddress": "02:42:c0:a8:31:02",
"IPv4Address": "192.168.49.2/24",
"IPv6Address": ""
}
},
"Options": {
"--icc": "",
"--ip-masq": "",
"com.docker.network.driver.mtu": "1500"
},
"Labels": {
"created_by.minikube.sigs.k8s.io": "true",
"name.minikube.sigs.k8s.io": "minikube"
}
}
]
Confirm access to the web app;
curl http://192.168.49.2:31524It works!
To access this web app externally, do port forwarding! Because clearly, my bridged address above is not accessible from my host externally.
minikube kubectl -- port-forward service/apache-service 80:8080 --address=0.0.0.0This command exposes the app listening on local port 80/tcp in the cluster on any host IP on port 8080/tcp on the host.
You can then access this service externally via port 8080/tcp.

Conclusion
Sample minikube dashboard;
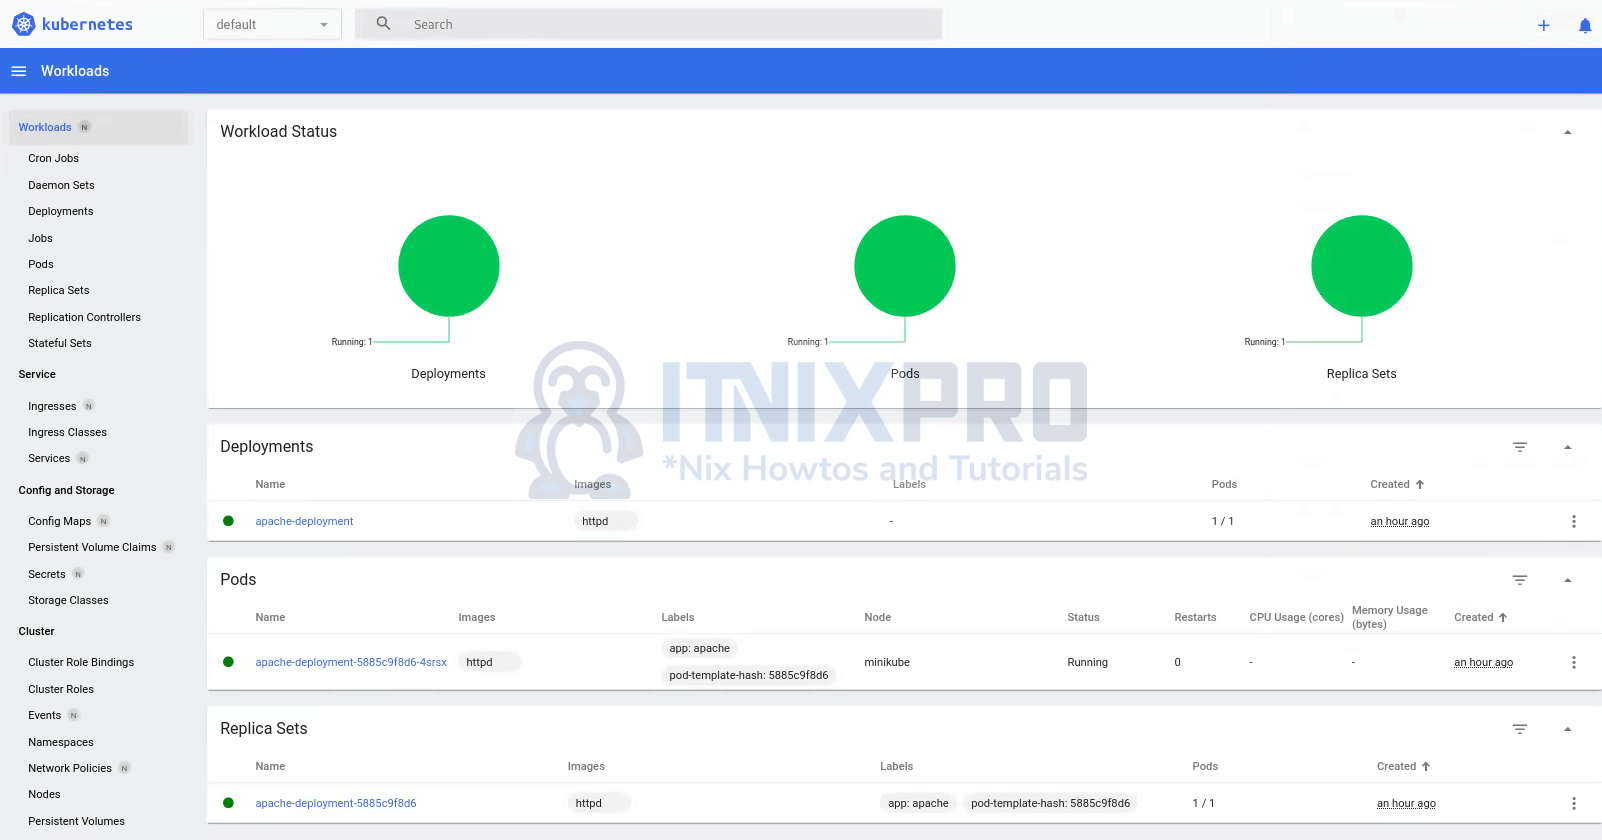
That concludes our guide.