
This article will take you through how to install VNC Server on Fedora 36. Virtual Network Computing abbreviated as VNC is a graphical desktop sharing solution that enables you to control a distant computer by sending keyboard, mouse, and touch events to the VNC server.
To operate another machine remotely, it makes use of the Remote Frame Buffer protocol (RFB). Through a network, it transmits graphical screen updates along with keyboard and mouse input from one system to another.
How to Install VNC Server on Fedora 36
- Start by installing a desktop environment using the command below in case you are using Fedora sever. For Fedora desktop users ignore.
sudo dnf install @xfce-desktop-environment- There are many types of VNC servers, in this example, we will use TigerVNC. Run the following command to install TigerVNC on Fedora 36.
sudo dnf install tigervnc-server -ySample output
Last metadata expiration check: 0:57:23 ago on Wed 29 Jun 2022 09:34:44 PM EAT.
Dependencies resolved.
==============================================================================
 Package                Architecture Version              Repository     Size
==============================================================================
Installing:
 tigervnc-server        x86_64       1.12.0-6.fc36        updates       259 k
Installing dependencies:
 tigervnc-selinux       noarch       1.12.0-6.fc36        updates        24 k

Transaction Summary
==============================================================================
Install  2 Packages

Total download size: 284 k
Installed size: 682 k
Downloading Packages:
(1/2): tigervnc-selinux-1.12.0-6.fc36.noarch.  15 kB/s |  24 kB     00:01
(2/2): tigervnc-server-1.12.0-6.fc36.x86_64.r 125 kB/s | 259 kB     00:02
------------------------------------------------------------------------------
Total                                          73 kB/s | 284 kB     00:03
Running transaction check
Transaction check succeeded.
Running transaction test
Transaction test succeeded.
Running transaction
  Preparing        :                                                      1/1
  Running scriptlet: tigervnc-selinux-1.12.0-6.fc36.noarch                1/2
  Installing       : tigervnc-selinux-1.12.0-6.fc36.noarch                1/2
  Running scriptlet: tigervnc-selinux-1.12.0-6.fc36.noarch                1/2
  Installing       : tigervnc-server-1.12.0-6.fc36.x86_64                 2/2
  Running scriptlet: tigervnc-server-1.12.0-6.fc36.x86_64                 2/2
  Verifying        : tigervnc-selinux-1.12.0-6.fc36.noarch                1/2
  Verifying        : tigervnc-server-1.12.0-6.fc36.x86_64                 2/2

Installed:
  tigervnc-selinux-1.12.0-6.fc36.noarch  tigervnc-server-1.12.0-6.fc36.x86_64

Complete!
- Next, allow VNC service on your firewall.
sudo firewall-cmd --add-service=vnc-server --permanent- Then reload the firewall to apply changes.
sudo firewall-cmd --reload- In the VNC config file add display settings.
sudo nano ~/.vnc/configSample file
## Supported server options to pass to vncserver upon invocation can be listed
## in this file. See the following manpages for more: vncserver(1) Xvnc(1).
## Several common ones are shown below. Uncomment and modify to your liking.
##
# securitytypes=vncauth,tlsvnc
# desktop=sandbox
# geometry=2000x1200
# localhost
# alwaysshared
session=gnome
securitytypes=vncauth,tlsvnc
geometry=800x600
- Add a user that will be used with the VNC server.
sudo useradd demouser- Set the password for the added user.
sudo passwd demouser- Next, log in to the created user to set the VNC password. Start by changing to the superuser.
sudo -i- Then login to the user-created above.
su - demouser- Set a password for your VNC server using the following command.
vncpasswdSample output
Password:
Verify:
Would you like to enter a view-only password (y/n)? n
A view-only password is not used
- Next, bind users to the VNC display. Open user config file
sudo nano /etc/tigervnc/vncserver.usersEnter display number followed by username as the example below.
## TigerVNC User assignment
#
# This file assigns users to specific VNC display numbers.
# The syntax is =. E.g.:
#
# :2=andrew
# :3=lisa

:1=itnixpro
:2=demouser
- Enable the VNC server to run on boot and start it.
sudo systemctl enable --now vncserver@:1 vncserver@:2- Alternatively, to start a specific display the command below can be used.
vncserver :2 -geometry 800x600Configure VNC Client
- By default, the first VNC display runs on port 5901, the second display runs on port 5902, and so on depending on the number of displays you have running.
- On your VNC client enter your VNC server IP followed by port 5902(Display number you are connecting with) as shown below.
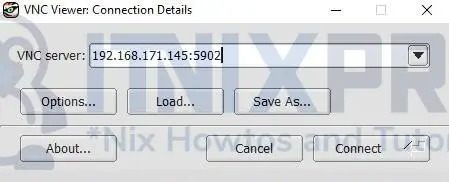
- Note, that you can get your VNC server IP by running the following command.
ip a- Next, enter your VNC server password.
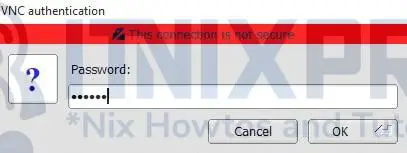
- When your connection is successful you will be able to interact with your Fedora running VNC server.

- You have made it to the end of our article, congratulations. We have gone through how to install VNC Server on Fedora 36.
Read more about TegerVNC
Other Tutorials
Install VNC Server on OpenSUSE