
This article is going to take you through on how to Install and Configure VNC server on Debian 11.VNC server is a graphical desktop sharing system that allows you to control the desktop of a remote computer (running VNC Server) from your device by sending keyboard, mouse, and touch events to VNC Server.
Virtual Network Computing (VNC) is a graphical desktop-sharing system that uses the Remote Frame Buffer protocol (RFB) to remotely operate another machine. It relays graphical-screen changes while sending keyboard and mouse input via a network from one system to another.
How to Install and Configure VNC server on Debian 11
- Update your packages.
sudo apt update- Next install
lightdmdisplay manager using the command below.
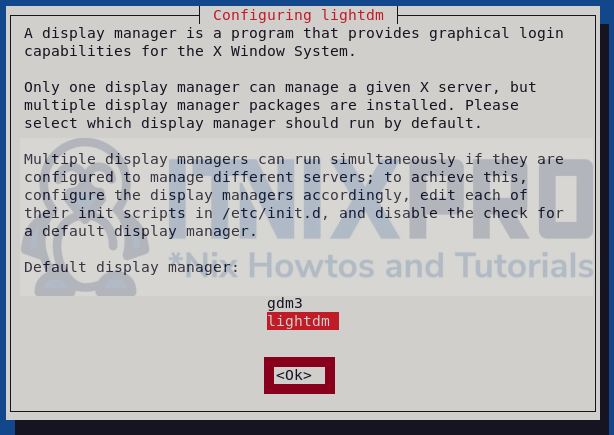
sudo apt-get install lightdmWhen prompted to select display manager choose lightdm as shown below.
- Reboot your system to apply changes.
sudo reboot- Then we’ll install x11vnc VNC server using the following command.
sudo apt-get install x11vncSample output
Reading package lists... Done
Building dependency tree... Done
Reading state information... Done
The following packages were automatically installed and are no longer required:
  bc cups cups-browsed cups-client cups-core-drivers cups-daemon
  cups-filters cups-filters-core-drivers cups-ipp-utils cups-ppdc
  cups-server-common fonts-symbola hyphen-en-us iw
  javascript-common libcupsfilters1 libfontembed1 libglu1-mesa
  liblouisutdml-bin liblouisutdml-data liblouisutdml9
  libpoppler-cpp0v5 libqpdf28 libreoffice-help-common
  libreoffice-help-en-us mythes-en-us node-normalize.css sudo
  x11-apps x11-session-utils xinit
Use 'sudo apt autoremove' to remove them.
The following additional packages will be installed:
  libtcl8.6 libtk8.6 libvncclient1 tcl tcl8.6 tk tk8.6
Suggested packages:
  tcl-tclreadline
The following NEW packages will be installed:
  libtcl8.6 libtk8.6 libvncclient1 tcl tcl8.6 tk tk8.6 x11vnc
0 upgraded, 8 newly installed, 0 to remove and 0 not upgraded.
Need to get 3,199 kB of archives.
After this operation, 9,526 kB of additional disk space will be used.
Do you want to continue? [Y/n] y
Get:1 http://deb.debian.org/debian bullseye/main amd64 libtcl8.6 amd64 8.6.11+dfsg-1 [1,018 kB]
Get:2 http://deb.debian.org/debian bullseye/main amd64 libtk8.6 amd64 8.6.11-2 [780 kB]
Get:3 http://deb.debian.org/debian bullseye/main amd64 libvncclient1 amd64 0.9.13+dfsg-2 [178 kB]
Get:4 http://deb.debian.org/debian bullseye/main amd64 tcl8.6 amd64 8.6.11+dfsg-1 [124 kB]
Get:5 http://deb.debian.org/debian bullseye/main amd64 tcl amd64 8.6.11+1 [5,788 B]
Get:6 http://deb.debian.org/debian bullseye/main amd64 tk8.6 amd64 8.6.11-2 [72.3 kB]
Get:7 http://deb.debian.org/debian bullseye/main amd64 tk amd64 8.6.11+1 [5,828 B]
Get:8 http://deb.debian.org/debian bullseye/main amd64 x11vnc amd64 0.9.16-7 [1,017 kB]
Fetched 3,199 kB in 1s (2,537 kB/s)
Selecting previously unselected package libtcl8.6:amd64.
(Reading database ... 143239 files and directories currently installed.)
Preparing to unpack .../0-libtcl8.6_8.6.11+dfsg-1_amd64.deb ...
Unpacking libtcl8.6:amd64 (8.6.11+dfsg-1) ...
Selecting previously unselected package libtk8.6:amd64.
Preparing to unpack .../1-libtk8.6_8.6.11-2_amd64.deb ...
Unpacking libtk8.6:amd64 (8.6.11-2) ...
Selecting previously unselected package libvncclient1:amd64.
Preparing to unpack .../2-libvncclient1_0.9.13+dfsg-2_amd64.deb ...
Unpacking libvncclient1:amd64 (0.9.13+dfsg-2) ...
Selecting previously unselected package tcl8.6.
Preparing to unpack .../3-tcl8.6_8.6.11+dfsg-1_amd64.deb ...
- After the installation, create system service using the command below.
sudo nano /lib/systemd/system/x11vnc.serviceThen paste the config file below into the file.
[Unit]
Description=x11vnc service
After=display-manager.service network.target syslog.target

[Service]
Type=simple
ExecStart=/usr/bin/x11vnc -forever -display :0 -auth guess -passwd #password#
ExecStop=/usr/bin/killall x11vnc
Restart=on-failure

[Install]
WantedBy=multi-user.target
Remember to change #password# with your preferred password in the file.
- Update the changes by running the reload command below.
systemctl daemon-reload- Then enable the service
systemctl enable x11vnc.service- Next start the the VNC server using the command below.
systemctl start x11vnc.service- You can confirm it’s running using the following command.
systemctl status x11vnc.serviceSample output
● x11vnc.service - x11vnc service
     Loaded: loaded (/lib/systemd/system/x11vnc.service; enabled; vendor preset: enabled)
     Active: active (running) since Tue 2022-04-26 10:59:32 EAT; 22min ago
   Main PID: 4143 (x11vnc)
      Tasks: 1 (limit: 4623)
     Memory: 14.4M
        CPU: 4.436s
     CGroup: /system.slice/x11vnc.service
             └─4143 /usr/bin/x11vnc -forever -display :0 -auth guess
Test VNC client
- To connect to VNC server, you need VNC client installed in your client machine e.g. Windows, Linux, or macOS.
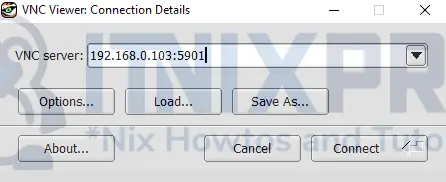
- In this example we will use TigerVNC on windows 10, download it from here or if you are using debian distro as client you can install it by running the command below.
sudo apt install tigervnc-viewer- Next enter your VNC server IP i.e the Debian IP that VNC server is installed followed by port 5901 as shown below.
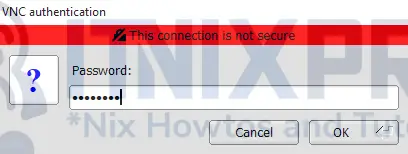
- You will be required to enter your VNC server password to connect.
- After successful connection, you will be able to access Debian 11 running VNC server.

- It’s a wrap! you have made it to the end of our article. Cheers! You have learned how to Install and Configure VNC server on Debian 11.
Read more about VNC
Other Tutorials
Install and Configure VNC server on Ubuntu 22.04