
This tutorial is going to show you how to install and configure VNC server on Ubuntu 22.04. VNC server is a graphical desktop sharing system that lets you control the desktop of a distant computer (running VNC Server) from your device, and it sends keyboard, mouse, and touch events to VNC Server so you can control the machine once you’re connected.
Virtual Network Computing (VNC) is a graphical desktop-sharing system that employs the Remote Frame Buffer protocol (RFB) to control another computer remotely in computing. It relays graphical-screen changes while transmitting keyboard and mouse input from one machine to another over a network.
How to Install and Configure VNC server on Ubuntu 22.04
Use the timestamps below to jump into the future in case you want something specific;
Install Desktop Environment on Ubuntu 22.04
- Start by running system update
sudo apt update- Then run the following command using APT to install VNC from it’s base repository as tigervncserver.
sudo apt install tigervnc-standalone-server tigervnc-xorg-extensionOutput
Reading package lists... Done
Building dependency tree
Reading state information... Done
The following additional packages will be installed:
  libfile-readbackwards-perl tigervnc-common
Suggested packages:
  xfonts-100dpi | xfonts-75dpi
The following NEW packages will be installed:
  libfile-readbackwards-perl tigervnc-common tigervnc-standalone-server
  tigervnc-xorg-extension
0 upgraded, 4 newly installed, 0 to remove and 5 not upgraded.
Need to get 1,318 kB of archives.
After this operation, 3,763 kB of additional disk space will be used.
Do you want to continue? [Y/n] y
Get:1 http://us.archive.ubuntu.com/ubuntu focal/universe amd64 libfile-readbackwards-perl all 1.05-2 [10.8 kB]
Get:2 http://us.archive.ubuntu.com/ubuntu focal/universe amd64 tigervnc-common amd64 1.10.1+dfsg-3 [69.0 kB]
Get:3 http://us.archive.ubuntu.com/ubuntu focal/universe amd64 tigervnc-standalone-server amd64 1.10.1+dfsg-3 [1,017 kB]
Get:4 http://us.archive.ubuntu.com/ubuntu focal/universe amd64 tigervnc-xorg-extension amd64 1.10.1+dfsg-3 [221 kB]
Fetched 1,318 kB in 10s (134 kB/s)
Selecting previously unselected package libfile-readbackwards-perl.
(Reading database ... 245629 files and directories currently installed.)
Preparing to unpack .../libfile-readbackwards-perl_1.05-2_all.deb ...
Unpacking libfile-readbackwards-perl (1.05-2) ...
Selecting previously unselected package tigervnc-common.
Preparing to unpack .../tigervnc-common_1.10.1+dfsg-3_amd64.deb ...
Unpacking tigervnc-common (1.10.1+dfsg-3) ...
Selecting previously unselected package tigervnc-standalone-server.
Preparing to unpack .../tigervnc-standalone-server_1.10.1+dfsg-3_amd64.deb ...
Unpacking tigervnc-standalone-server (1.10.1+dfsg-3) ...
Selecting previously unselected package tigervnc-xorg-extension.
Preparing to unpack .../tigervnc-xorg-extension_1.10.1+dfsg-3_amd64.deb ...
Unpacking tigervnc-xorg-extension (1.10.1+dfsg-3) ...
Setting up libfile-readbackwards-perl (1.05-2) ...
Setting up tigervnc-common (1.10.1+dfsg-3) ...
update-alternatives: using /usr/bin/tigervncconfig to provide /usr/bin/vncconfig (vncconfig) in auto mode
update-alternatives: using /usr/bin/tigervncpasswd to provide /usr/bin/vncpasswd (vncpasswd) in auto mode
Setting up tigervnc-xorg-extension (1.10.1+dfsg-3) ...
Setting up tigervnc-standalone-server (1.10.1+dfsg-3) ...
update-alternatives: using /usr/bin/tigervncserver to provide /usr/bin/vncserver (vncserver) in auto mode
update-alternatives: using /usr/bin/Xtigervnc to provide /usr/bin/Xvnc (Xvnc) in auto mode
Processing triggers for man-db (2.9.1-1) ...
- Next run
sudo apt install xserver-xorg-core- Then run the command below to install Gnome desktop in case you don’t have it already in your system. Note, if you are using Ubuntu desktop Gnome is already installed in your system.
sudo apt install ubuntu-gnome-desktop- GDM service should be started.
sudo systemctl start gdm- Set the VNC password
vncpasswdOutput
Password:
Verify:
Would you like to enter a view-only password (y/n)? n
- Run the server using the command below.
vncserverOutput
New 'ubuntu:1 (kigz)' desktop at :1 on machine ubuntu

Starting applications specified in /etc/X11/Xvnc-session
Log file is /home/kigz/.vnc/ubuntu:1.log

Use xtigervncviewer -SecurityTypes VncAuth -passwd /home/kigz/.vnc/passwd :1 to connect to the VNC server.
- The above output shows the server is running fine. Kill the server using the following command.
vncserver -kill :*Configure the VNC Server’s desktop environment
- Start by making a backup of your XStartup file.
mv ~/.vnc/xstartup ~/.vnc/xstartup.bak- Create a new file if the file does not exist on your system.
nano ~/.vnc/xstartup- In the file, paste the following code.
#!/bin/sh
[ -x /etc/vnc/xstartup ] && exec /etc/vnc/xstartup
[ -r $HOME/.Xresources ] && xrdb $HOME/.Xresources
vncconfig -iconic &
dbus-launch --exit-with-session gnome-session &
- If you are new to nano editor, press ctrl+s to save and ctrl+x to exit.
- Start the server with the screen size you desire; we’ll use 1024×768 here, but you may change it to any size you wish.
vncserver -localhost no -geometry 1024x768 -depth 24- Now that our Ubuntu 22.04 server is up and running, we want to be able to access it remotely. After that, go to your local Windows, Linux, or macOS computer and install Tiger VNC or another types of VNC program.
- We will use TigerVNC in our example, you can download it from here. If you are using Linux Debian distro e.g. Ubuntu run the command below.
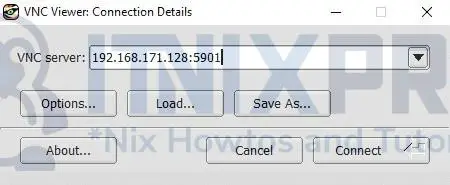
sudo apt install tigervnc-viewer- After downloading TigerVNC where you want to access your remote Ubuntu system, enter the IP address of your Ubuntu where VNC server is running followed by port 5901 as shown below. e.g.
server-ip:5901
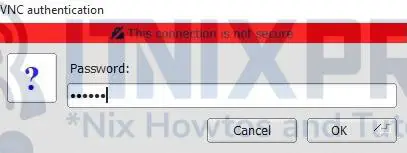
- Then enter password for your VNC server which you are connecting to.
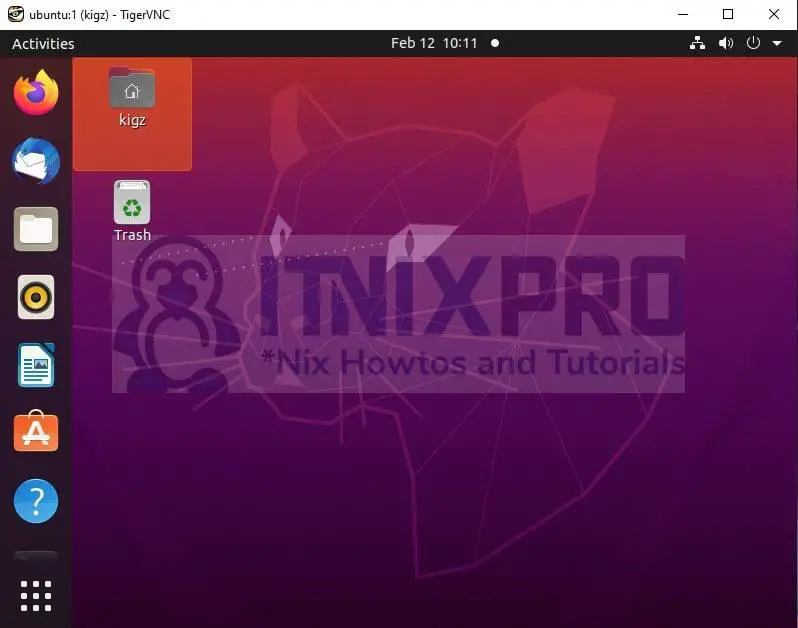
- Your remote Ubuntu system will open. Note both computers should be connected to the internet.
Create a VNC server service file in Systemd
- You can run VNC server as a background service so that it can run automatically when the computer is on. To do so you need make a Systemd configuration file for it.
- First, stop the currently running instance.
vncserver -kill :*- Then create a file for the VNC server.
sudo nano /etc/systemd/system/[email protected]- Paste
[Unit]
Description= Tiger VNC Server service
After=syslog.target network.target

[Service]
Type=forking
User=**kigz**
ExecStartPre=/usr/bin/vncserver -kill :%i > /dev/null 2>&1
ExecStart=/usr/bin/vncserver -geometry 1024x768 -depth 24 -localhost no :%i
ExecStop=/usr/bin/vncserver -kill :%i

[Install]
WantedBy=multi-user.target
- Note: Kigz should be replaced with your current user.
Start and enable VNC server to run automatically
- Run the following command to start and enable your VNC server to run as a service
sudo systemctl start vncserver@1
sudo systemctl enable vncserver@1- Note, @1 denotes vncserver:1 – display 1 in this case.
- Check status
sudo systemctl status vncserver@1Sample output
● [email protected] - Tiger VNC Server service
     Loaded: loaded (/etc/systemd/system/[email protected]; enabled; vendor preset: enabled)
     Active: active (running) since Sat 2022-02-12 10:49:50 EAT; 1min 15s ago
      Tasks: 33 (limit: 9419)
     Memory: 23.4M
     CGroup: /system.slice/system-vncserver.slice/[email protected]
             ├─13934 /usr/bin/Xtigervnc :1 -desktop ubuntu:1 (kigz) -auth /home/kigz/.Xauthority -geometry 800x600 -depth 24 -rfbwait 30000 -rfbauth /home/kigz/.vnc/pa>
             ├─13951 vncconfig -iconic
             ├─13955 dbus-launch --exit-with-session gnome-session
             ├─13956 /usr/bin/dbus-daemon --syslog --fork --print-pid 5 --print-address 7 --session
             ├─13972 /usr/libexec/at-spi-bus-launcher
             ├─13977 /usr/bin/dbus-daemon --config-file=/usr/share/defaults/at-spi2/accessibility.conf --nofork --print-address 3
             ├─13981 /usr/libexec/gvfsd
             ├─13986 /usr/libexec/gvfsd-fuse /home/kigz/.cache/gvfs -f -o big_writes
             ├─14015 /usr/libexec/dconf-service
             └─14027 /usr/bin/gnome-keyring-daemon --start --components=ssh

Feb 12 10:49:53 ubuntu gnome-shell[14057]: Unset XDG_SESSION_ID, getCurrentSessionProxy() called outside a user session. Asking logind directly.
- To stop it, run the command below.
sudo systemctl stop vncserver@1- Congratulations you have reached the end of the article. You have learned how to Install and Configure VNC server on Ubuntu 22.04.
Other Tutorials
Install Webmin on Ubuntu 22.04
Yeah this doesn’t work. When running with -localhost no, vncserver fails to bind to the network interface, it works as root.
Looks like after executing as root:
vncserver -localhost no
when i run it as a user it now binds? No idea